Showing posts with label eyes. Show all posts

23 Apr 2014

review: too faced natural eye palette


Hey guys!

It feels like forever since I have actually sat down to do a blog post for you guys! Usually, I do five posts a weeks Monday to Friday, but unfortunately due to university, work and internship commitments, I have little time to photograph and write posts which sucks because I do really miss it. But, until I have more time, I will be sticking to three posts a week - Monday, Wednesday and Friday! This is just because I would rather give you guys three great posts rather than five mediocre ones. Of course, I am nearly always available on my social media networks, which are always linked below at the end of my posts :)

So todays post will be a review on one of my all time favourite palettes. Some of you will know from my earlier posts that I am generally a neutral eye girl - I don't think I wear eyeshadow enough to warrant having one with crazy colours! This is, alongside of my Urban Decay Naked 1, my most used palette. It is just simply perfect for everyday, and is appropriately packaged for travelling as well!

Read on to see swatches and my thoughts on the shades!


I won't lie - I adore all things Too Faced. They are 100% one of my all time favourite brands, and I think they are reasonably priced for a high end brand. They are great quality, and you also get a decent amount of product considering the price you pay. This palette is no different!


Like the majority of their other palettes, it comes with these three cards that give you different ideas for an eye look incorporating the palette. These are great, especially if you are a beginner and are not sure what colours should go with which. 


The shades themselves!

How beautiful do they look.. So gorgeous, you can tell its a neutral eye palette but it also has a little bit of a twist with the shimmery pinks and gold. It's a mix of mattes and shimmers, with the palette focusing on the shimmers this time. The majority of them are opaque and pigmented, but I have to say I was disapointed in one particular shade with how it applied. But aside from that, I am impressed and nearly all shades apply like butter!

And here are the swatches!


First column:

Heaven: A matte white highlight shade. This does take a couple of swipes to build up the colour
Silk Teddy: A shimmery light pink, another highlight colour. Very subtle!
Nude Beach: Seems to be a light pink with pink and silver glitters. I'm a bit disappointed in this shade, as it really only swatches glitter and it fallout goes everywhere!


Middle column:

Velvet Revolver: A very cool toned matte brown, so cool that it's almost grey - a great transition shade
Push Up: A dusty pink shimmery shade
Honey Pot: A gold shimmery shade. This shade and Push Up go on like butter!


Last column:

Sexpresso: A dark cool toned matte brown shade
Erotica: A dark brown shade with gold shimmers
Cocoa Puff: A warmer brown shade with subtle shimmers

I've said it before and I'll say it again - how freakin' amazing is Too Faced! If you are just beginning your makeup journey, this would be your perfect palette. Yes it costs a little more, but its easy to travel with (it's virtually unbreakable), plus it has no scary shades and can be used everyday.

I'm not 100% sure if this version of the palette is still readily available - Too Faced actually re-released this palette this year, and replaced Nude Beach, Velvet Revolver and Cocoa Puff with new different shades. The new shades are still pretty much identical to the ones in this palette though, so I'm not sure of the reasoning behind changing them.

Unfortunately, I can't find it online at the usual Australian stockists (it's temporarily unavailable), and I assume that's because this new version will soon be arriving and taking its place. You can find Too Faced cosmetics here at this website www.kitcosmetics.com.au , and they should hopefully have this palette in stock soon. Their palettes usually range from $50-60AU.

Have you tried this palette? What are your thoughts?

Until next time...

xxxx


in between blogging, you can find me here!

2 Apr 2014

lorac pro palette tutorial: summer bronze eyes

Hey guys!

Yesterday I did a first impression of the Lorac Pro Palette (click here to read  the first impression, plus all about the palette and shades!), and today I will be doing a quick tutorial for you! I was inspired by the shades Lt Bronze and Garnet, and really wanted to create a simple summer appropriate look for you guys!

The shades are amazing, and they all apply like butter! The pigmentation is unbelievable, and the fallout is minimal. This was my first time actually using the palette and I am so so so impressed. If I thought that others needed it before, I am now completely 100% sure you need this in your life. Especially if you are a fan of neutral shades that have a bit of a kick.


If you want to see how to get the above eye look, keep reading!


The first thing I did was dip into Lt Bronze. I applied this on a flat shader brush all over my lip, packing the majority of the colour on the inner third and dragging whatever was left onto the last half of my lid.


After this, I took the colour Garnet (which I am in total love with, by the way), and packed this onto the last third of my eye where I just lightly put Lt Bronze. I went over this a couple of times, just to make the colour more intense, and I just used a patting motion rather than a swiping motion to really get the colour to build up.


Once I had got the colour to the intensity I wanted, I took the matte colour Sable and blended this through my crease and a little on my outer v. The reason I chose this above the other matte browns in the palette was because it was a very warmed toned reddish brown - I felt this really complimented the Garnet shade. After this, I took a clean blending brush with no product on it and blended the edges of the eyeshadow.


I then finished the rest of my makeup. Once I had finished, I dipped into Lt Bronze again and packed it more intensely on the inner third of my eye.


I then took a pencil brush and went back into Sable. I blended this out along my lower lash line, stopping just before the inner corner. I then also took the Garnet shade again and pressed it a little over where I just put Sable. I then put Lt Bronze on the inner corner and dragged a little more along my the inner part of my lower lash line. I then highlighted my brow bone with the matte shade White.


I then took a kohl liner and did a thin line on my upper lash line. After doing this to both eyes, I went in with the shade Black and smudged that liner out a little bit. I then added a nude eyeliner to my bottom water line and some mascara to my upper and lower lashes.


And this is the finished look!


I paired this with bronzer around the perimeters of my face, and a rose gold blush. I didn't contour as I felt it would be too dramatic for this look. I also used a coral orange lipstick and gold toned highlighter to finish off the look. I love how it turned out, and I'm kicking myself that I only got this palette now! We're a month into Autumn now, but I will be loving this for spring and summer later in the year!

If you would like me to do more looks with this palette please let me know!

Products used in this look:

Bourjois Happy Light Primer
Bourjois CC Cream in 32 Light Beige
Revlon Photoready Skinlights in 001 Bare Light
Maybelline Age Rewind Concealer in Fair
Revlon Colourstay Eyebrow Pencil in Blonde
MAC Mineralize Skin Finish in Light
Too Faced Milk Chocolate Soliel Bronzer
Benefit Rockateur Blush
TheBalm Mary-Lou Manizer Highlighter
Lorac Pro Palette - White, Sable, Black, Lt Bronze & Black
Rimmel Kajal Khol Eyeliner in Black
Rimmel Scandaleyes Eyeliner in Nude
Rimmel Lash Accelerator Mascara in Black
MAC Lipstick in Ravishing

Until next time...

xxxx


in between blogging, you can find me here!


12 Mar 2014

tutorial: easy chocolate smokey eye

Hey guys!

After yesterday's first impression on the Too Faced Chocolate Bar Palette (click here to read a overview of the palette and all the shades), I really wanted to do a tutorial to show you the versatility of the shades! At first, I was planning to do a rusty brown smokey eye focusing on the colour Amaretto, but unfortunately the colour didn't quite show up like I expected. So I changed it up, and decided to do a brown smokey eye instead!

The best thing about this look is that you don't really need the exact shades in this palette to get the same look! You can easily grab different warm toned browns and champagnes from other palettes and easily recreate this. Obviously, I did want to try to do something a little different, but sometimes its good to go with what you know and give you guys something that doesn't require too much technique or pricey palettes.

So if you want to know how to get this look, keep on reading ;)


First of all, I look the colour Salted Caramel, which is a lovely, very warm toned brown, and blended this into and above my crease. I love to put transition colours above my crease, as I do have smaller eyes than I would like, and this gives the impression that they are more round and large.


After blending Salted Caramel out, I took the shade Marzipan which is a yellow toned shimmery champagne colour, and put this all over my lid, focusing most of the colour on the inner third. This didn't quite show up as much as I wanted, so later on I did wet my brush with setting spray and went back over the colour to make it more pigmented and intense.


After I did that, I dipped into the colour Amaretto and pressed this into my outer V and up to my crease. Unfortunately, even after going over it a couple of times, the colour really wasn't showing up as I had hoped. To intensify it, I took the colour Semi-Sweet which is a matte deep brown, and pressed it over where I put Amaretto, and also into my crease.


I then took Salted Caramel again on my blending brush and went along the edges so that it softened the look.


And then of course I took my MAC Pro Longwear Concealer and crisped up the egdes. I really get messy with my eyeshadow, so I usually need this step to clean it up so that it looks more put together.


After finishing the rest of my makeup, I touched up the eyes. I wet my brush, and went back in with Marzipan to intensify the colour. I also put this on my inner corners. I also touched up the outer V with Semi-Sweet, and then light pressed Amaretto over the top so it did show some of that rusty brown, and blended it out with Salted Caramel once again. I then put White Chocolate (the matte white highlight colour) and placed this on my browbone.


After those steps, I blended both Salted Caramel and Semi-Sweet under my lash line and tightlined with black eyeliner, lined my waterline with a nude eyeliner and added mascara. I was going to add liquid liner to line my lid and create a little cat eye, but I preferred the soft feel this had to it.

And the look is complete!


As you can see, this really gives the eye definition and opens them up to look big and rounded. You can really wear this look anywhere, as I don't think it's too harsh or dark to be considered a night time look. I would wear it out to coffee, or out on a date with my partner - it is just so super easy and takes no time to create! I teamed it with glowing skin, a soft contour and nude lips, which is my personal preference for an eyeshadow look! But you could easily pair this with a bolder lip and more dramatic contour as the eyes are really smoked out with no harsh colours or edges.

Although I wish I had a different look from this palette for you guys, I know this is something that would suit most skin tones and eye colours. But it does show you how well the colours all work together from this palette, and how seamlessly it all fits together.

If you would like to see a bolder look with this palette, please let me know! I am more than happy to create more looks with this for you, and do something more dramatic!

Products used:
Bourjois Happy Light Primer
Bourjois CC Cream in #32
Bourjois Healthy Mix Serum Foundation in #53 Light Beige
MAC Pro Longwear Concealer in NW20
MAC Mineralize Skin Finish in Light
Maybelline Fit Me Shine Free Foundation Stick in 330
Nars Laguna Bronzer
TheBalm's Cindy-Lou Manizer (as blush)
TheBalm's Mary-Lou Manizer (as highlight)
Revlon Colorstay Eyebrown Pencil in Blonde
Too Faced Better Than Sex Mascara
Rimmel Kajal Kohl Eyeliner in Black
Rimmel Scandaleyes Eyeliner in Nude
Too Faced Chocolate Bar Palette - White Chocolate, Salted Caramel, Marzipan, Semi-Sweet & Amaretto
OCC Lip Tar in Hush

Until next time...

xxxx
11 Mar 2014

first impression: too faced chocolate bar palette

Hey guys!

I am so excited to finally bring you today's post. I have literally kept my hands off the shadows in this palette since I received it, as I wanted this to be a true first impression of the shades and their quality. I have only opened and closed it, and let me tell you.. this looks and smells good enough to eat. Without further ado, let me introduce to you today's blogpost and highly anticipated first impression...

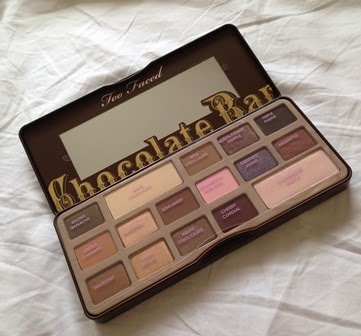
The Too Faced Chocolate Bar Palette!


Oh gee.. I literally love all things Too Faced. There is not a product from them that I have disliked, and I always remember them for their packaging. Check out how cute the box is that the palette comes in! It reminds me of a Willy Wonka chocolate bar, and I feel it is so perfect and girly. I can't even bring myself to throw away this box, because its too pretty!


When you first open the box, you get the palette and also these index cards, which basically have three looks using shadows from the palette and how to recreate them. This is pretty typical from Too Faced, with every eye shadow palette they come out with, they usually include some inserts with looks. They are helpful if you're not sure what to create on your own.

And then of course, the palette..


If any of you are waiting on this palette, I'm going to give you a tip. When you first open it, inhale deeply. Smell that? Oh yea, thats chocolate. If you know the smell of the Too Faced Chocolate Soliel Bronzer, basically imagine that times 10. The smell is just incredible, that it makes me want to eat the palette. It makes sense, seeing as it is made with cocoa!

Also, check out that packaging. Again, Too Faced hits the nail on the head. The palette is shaped just like a chocolate bar! The shadows are housed in tin packing, which opens and closes pretty easily. I think its magnetized, rather than the Urban Decay Naked 2 & 3 for example, where the tin actually locks when its closed. Because of that, I'm not sure how great this would be to travel with, but the packaging itself is sturdy.

Once open, you can see the palette has quite a sizeable mirror! It's definitely big enough to be able to do your whole eye look with. You know how some mirrors are just so tiny, and you just cannot use it to do your eyes? Well, there will be no problems with this one! The palette itself comes with 16 shadows, ranging from pinks, reds, violets, browns, neutrals and whites that are all different textures; some are matte, some have shimmer and others are glittery. Overall, it really sticks to the chocolate theme, and focuses on the neutral shades, with a couple of colourful shades to mix things up.

The shadows themselves are great - they have pretty decent colour pay off, and all go on like butter. Really, they are very seamless; they all work really well together and compliment the other shades in the palette. I can see how easy it would be to create looks with only this palette, you can see that it has been designed so that no other shadows outside of the palette need to be used.

First row (l-r) - Gilded Ganache, White Chocolate, Milk Chocolate, Black Forest Truffle, Triple Fudge

Gilded Ganche - A deep brown shade with gold shimmer throughout
White Chocolate - A matte highlight shade
Milk Chocolate - A mid tone cool brown shade
Black Forest Truffle - A dark brown with what looks like pink shimmer throughout. Similar to Blackheart from the Urban Decay Naked 3 Palette
Triple Fudge - A matte dark brown shade

Second row (l-r) - Salted Caramel, Marzipan, Semi-Sweet, Strawberry Bon Bon, Candied Violet, Amaretto

Salted Caramel - An very wam toned brown. Very natural and neutral for the crease
Marzipan - A champagne shade
Semi-Sweet - A deep red, warm toned brown
Strawberry Bon Bon - A matte baby pink
Candied Violet - A purple shade with pink glitter
Amaretto - A rusty red, shimmery shade. This was the shade I was most excited about, especially when I swatched it and saw the sheen after it was applied. Beautiful shade!

Third row (l-r) - Hazelnut, Creme Brulee, Haute Chocolate, Cherry Cordial, Champagne Truffle

Hazelnut - A neutral, warm toned shimmery brown shade
Creme Brulee - A shimmery gold shade
Haute Chocolate - Similar to Hazelnut, except cool toned
Cherry Cordial - A red shade with a hint of shimmer. The shimmer didn't really translate when I swatched it on my arm
Champagne Truffle - The other highlight colour in the palette, and is a shimmery white shade

Overall, do I think you need this palette? Um yes! Especially if you are a fan of neutral shades, I would definitely recommend giving this a try. It is pricey, but its Too Faced - they're a highly reputable brand and you know that you're getting both quality and quantity for the price you pay. I have heard that people are comparing this to Urban Decay Naked 1, and saying that they are quite similar. I really don't think they are. They are both neutral palettes, and particular shades are similar, but I don't think that they are so similar that you can only pick one or the other.

I got this from www.beautybay.com , and I believe I paid $69.80AU for it. However, for Australians, this is available on www.kitcosmetics.com.au (which I wish I knew before) for $68.95AU, and if you spend over $75 you get free shipping. I would recommend going through them rather than BeautyBay, only because the palette comes from Australia itself, and they are a little more helpful if you have an issue. In the US, this retails for $49USD in both Ulta and Sephora.

I could harp on about this palette forever! I am such a neutral eye girl, and this palette really fulfills that need, plus it throws in a couple of colourful shades to really amp up any look. So glad that I brought it and that I finally own it :)

Stay tuned for tomorrows post - it will be involving this palette ;)

Until next time...

xxxx

28 Feb 2014

february beauty favourites!

 
Hey guys!
 
This is my favourite time of any month - everyone starts to film or post their favourites of the month and that gets me so excited.. I add to my wishlist every single time I watch or read a post. So naturally, you can imagine how excited I was about finally being able to share my favourite products of the month with you all! And not only have I gone overboard with the products, but my blog has also undergone a makeover to reflect my excitement! Hurray!
 
Because it is my first ever favourites post, but not the last I can assure you, I have gone a little crazy. For the most part, I really wanted to choose the few products that have really stood out to me this month.. But the problem is, I have loved and used all the products I'm about to talk about nearly everyday. And they were either brought in January or at the start of February. So I thought, screw it. You only get to do your first ever favourites post once! So here it is, my February Beauty Favourites of 2014!
 
FACE
 

1. Bourjois Happy Light Luminous Primer
Hands down my favourite primer yet! I brought this mid January, and have already gone through one bottle, the one pictured is my second. I basically use about two-twoandahalf pumps all over my face (it is pink in the bottle, but transparent once its rubbed in). It leave my face feeling so soft and hydrated, and foundation goes on like a dream! This retails for about $21AU.
 
2. Skin79 Super+ Pink BB Cream:
I have written about this BB cream already in this post so I'll make this short and sweet. I have used this ever since last year, and literally use it everyday underneath my foundation. It just colour corrects and adds a little bit of moisture to my skin before putting on my foundation so that my face matches the rest of my body. I highly highly highly recommend this!
 
3. Bourjois Healthy Mix Serum Foundation in 53 Light Beige:
This is a huge deal for me. I have been loyal to this foundation basically since I brought it, which is so unlike me. I am someone who flits from foundation to foundation because I have never found one that I believe works for every occasion. I am in looooove with this, oh my gosh. The colour is a little light, but honestly you can't even tell, and the coverage is just perfect. Plus, I have had no problems with cakeiness or it fading away. It is just perfection in a bottle, and I never want it to run out. This retails for $32AU.
 
4. NYX Dewy Mist Finishing Spray:
This is an everyday essential to me - it sets my face while also helping it to melt into my skin to look even more natural. Plus, its pretty affordable at $14.95AU at Target.
 
 
5. MAC Mineralize Skin Finishes in Light and Medium Deep:
I've had these for about a month now. I use Light to set my concealer in place and to add a bit of subtle highlighting, and I use Medium Deep to add a bit of dimension to my face. Not exactly to contour, but just when I want my appearance to look natural (and that I sort of have cheekbones). These are everyday essentials for me now. Love love love, and I wish I  had brought them a lot sooner. Not only do they set everything they touch in place, they are so finely milled that they give off this flawless and airbrushed look to my skin. I will 100% be repurchasing, but seeing I have used them pretty much everyday, they barely have a dent in them. These retail for $47 AU each.
 
EYES
 
 
6. Revlon Colourstay Eyebrow Pencil in Blonde:
I brought this midway through February after watching Shani Grimmond on Youtube used it on her brows. I used to use powder for my brows, and I was ok with the results but not blown away. So I decided on a whim to try this and I'm so happy I did. Seriously. It is a waxy crayon consistency (I find because of this, it sets my brow hairs in place as well), the colour is almost spot on and it literally cuts the time I used to spend filling them in in half. So glad I brought this, I'm sure its going to be a staple for quite some time. This retails for $21.95AU.
 
7. L'Oreal Voluminous False Fibre Lashes Mascara:
I'm a mascara fiend, in case you couldn't tell from the above picture (I'll go through them quickly, so don't worry). This one I brought in the US for around $8-9USD and its a great mascara! It has a rounded mascara wand, and its a bristle brush (which I prefer over plastic wands), and I just find this gives my lashes so much colour and volume! Especially as its a rounded, dipped down brush, it really curls them up and gets every single lash. I can't find this in any Australian stores, but it is available on eBay and I'm sure it would be available online elsewhere as well.
 
8. L'Oreal Voluminous Million Lashes Mascara:
L'Oreal would have to be my favourite drugstore brand for mascaras (sorry Maybelline), and I also brought this one in the US for $8-9. It has a plastic brush, but I don't mind it with this mascara. It gives a ton of volume, and clumps in the right way (does that make sense?). I honestly really like it, I use it all the time with the above mascara to lengthen and volumise my lashes. Love the combination, but wish this wasn't so overpriced in Australia! It retails for $27.95AU.
 
9. Too Faced Better Than Sex Mascara:
I love everything about this mascara. Its packaging is amazing, being pink and its heavy (almost like a weight), and the product inside is just as amazing. It has a hourglass shaped bristle brush that works magic on my lashes. It gives amazing volume and really just gives a false lash effect to them. One of the best high end mascaras I have ever tried. Retails for $31.95AU, which I honestly think is reasonable for a high end mascara.
 
10. Max Factor False Lash Effect Mascara:
My favourite everyday mascara. I've used this for about half a year and it is almost dried up (sob). I have it in the brown colour, and it really is perfect for everyday, as it looks so natural and gives my lashes a ton of volume that stays all day. It does have a plastic brush, but like the L'Oreal Voluminous Million Lashes, this doesn't bother me in the slightest. This retails for $24.95, and I really believe it's worth it. When I give up on this baby, I will be repurchasing straight away.
 
LIPS
 
 
11. Hourglass Femme Nude Lip Stylo in #3:
This packaging of this is to die for. So luxurious! The actual lipstick is amazing too! If you've read my earlier blog posts, you would know that I am sucker for a lipstick in a crayon form. No, seriously. I have to have them all. But this is on another level. It is a perfect peachy pink nude colour, and I carry it with me at all times. I will be purchasing more, but not right now.. I did get this from the US for $30USD but here it retails in Mecca Cosmetica for $42, which isn't half bad. I just need to come up with the $200+ for the whole collection.
 
12. Maybelline Bold Matte Lipstick in MAT7:
This is the nude colour, and there isn't really much to say. It is almost the same colour as my lips, just a touch more pink, and I wouldn't say its completely matte. It doesn't dry out my lips, and stays creamy the whole day. I do love it, and I find it perfect to wear to work. This retails for $16.95AU.
 
13. Australis Velourlips Matte Lip Cream in PA-REE:
Australia's answer to the NYX Matte Lip Creams. This is the nude one, and is a great colour that stays on literally all day. It isn't too nude, so it doesn't wash me out either! I want more of these as well, they really are a great formula and so affordable considering the product. These are only available in Australia and they retail for $9.95AU.
 
14. YSL Rouge Volupte Lipstick in #1 Nude Beige:
My favourite ever lipstick. Ever. I brought #7 Lingerie Pink in the US, and when I came home, I knew I needed this colour. So I forked over the money at David Jones before I could say no. This product is so luxurious, so creamy and it glides over your lips like a dream. You could have the driest lips in the world, but no one would know if you were wearing one of these lipsticks. The only problem with it is that it is so expensive, I hardly ever wear it because I can't really afford to repurchase it all the time! But it honestly is the most perfect pink ever, and it goes with everything. This retails for $55AU (gulp), but I would pay it again if I had too. That's how amazing this lipstick really is.
 
SKIN
 
 
15. Vaseline Intensive Care Spray Moisturiser in Cocoa Glow:
My last favourite! I have to say, before this I really neglected moisturising my body. I used to use the Vaseline moisturiser in the same scent as this and loved it, but I just found the whole process so tedious and boring, so I never did it (don't judge me, I'm not proud of my laziness). But when this came out (swoooooon), it fixed all my problems. Not only is it in the best scent ever (seriously, it smells like chocolate, Kahlua and Baileys all mixed together), but it makes my skin silky soft and it has stopped it from looking scaly (yay!). The only problem is I'm having to buy one every two weeks.. I'm onto my third can already (it was only released this month), with a backup in my cupboard. This retails for around $9.99.
 
So that is all my favourites! I know it was a lot for this month, but as I said, I may as well go all out for my first ever favourites post! And I have really been loving all of these products throughout the whole month, some of them even for a long time before.
 
Keep your eyes peeled for a weeks time, I'll be doing another monthly post for the products that didn't meet my standards ;)
 
Until next time..
 
xxxx