Showing posts with label first impression. Show all posts

7 Jul 2014

brand focus: thebalm!


Hey guys!

I posted a picture on my Instagram a couple of weeks ago after I managed to get my hands on some more TheBalm products, and asked if you would like to see a more in-depth review of the brand. I love using their products - they have such a fantastic range of great quality cosmetics, and I even have a wishlist to hopefully be fulfilled in the near future.

However, I really wanted to do a post on them because I honestly feel like TheBalm is relatively unknown here in Australia. Maybe this is because people don't know where to buy them (I certainly didn't until earlier this year) and think they are only available in the US - I can't say for sure. But there is no doubt in my mind that TheBalm is a brand that you need to introduce into your makeup collection.

TheBalm has a wide range of products available, and not it's not all cosmetics! Their line also includes skincare and hair care, and it's all paraben and cruelty free. Their philosophy is "Beauty in five minutes", and caters to a wide range of beauty lovers - from those who love more neutral easy to achieve looks and those who love daring, bold colours.

Of course, I don't own one of every single product from their line to show you guys - actually my collection is relatively small compared to some. But everything I own is absolutely gorgeous in it's own right, so highly pigmented and easy to use. So without further adieu, grab your cuppa' and settle in!


The first two products I have to show you are perhaps my favourite and most used of my TheBalm collection. Everyone knows TheBalm for their Loumanizer collection - namely Mary Lou (honey champagne highlighter), Betty Lou (bronze bronzer/highlighter) and Cindy Lou (pink toned highlighter). Of course, Mary Lou (right) is used by EVERYONE - and for good reason. It is THE most gorgeous highlight I own, so highly pigmented that I only need to dip my brush lightly once into the pan in order to achieve a beautiful glow on my cheekbones and the center of my face.

On the left we have Cindy Lou - another gorgeous and highly pigmented highlight shade. Although, this is meant to be a highlighter, I do actually prefer to use this as a highlighting blush. In darker skin tones, this would be actually gorgeous as a stand alone highlight. As you can see in the picture, its a peachy pink shade, with a hint of shimmer. Its so beautiful as a blush, because it just has this glowing sheen - sort of like the Milani Baked Blush in Luminoso, but better!


And of course, who could go past any of TheBalm blushes - even choosing these three colours were incredibly difficult because they are all so beautiful. From left to right, I own The Instain Blush in Swiss Dot (a matte coral shade), FratBoy Blush (a light pink shade) and another Instain Blush in Pinstripe (a deep plum purple shade).

The Instain Blushes are incredible - if you couldn't tell from their name, they act as a staining powder! These are hugely pigmented, and even when swatching them, it's a mission to get it off my hands. Both Swiss Dot and Pinstripe are gorgeous shades, are super easy to blend and as I said, are amazingly long wearing. The middle blush, FratBoy, is another better known TheBalm product and its so easy to wear. The shade is spot on for everyday wear, and its so fine milled and easy to apply.


Another product is the What's Your Type Mascara in Tall Dark And Handsome (they also have another in the What's Your Type Mascara line called Body Builder). I love this mascara to really separate my lashes and lengthen them - the brush pretty much ensures that I have zero clumping. I haven't used this to too much, due to the fact that I have way too many mascaras open as it is, but the few times I have used it, I have been seriously impressed with how it applies.


And now for the last product I own - the BalmJovi Rockstar Face Palette! This comes with twelve eyeshadows, a highlight shade, a blush shade and two lip colours. And possibly one of the standout things about this palette for me is the shade - all the names are play on words of popular rock bands and song names! If you couldn't tell from the palettes name..

Below I have swatches of all of the shadows and lip colours in the palette - really they speak for themselves! All beautiful shades with fantastic pigmentation, and are so beautifully creamy and glide on like butter! This palette does lean more neutral (hey, I know what I like!), but it does include some shades that are a little out of the ordinary to give it some variety.


From left to right: Metal-Ica, Adaglo, Blink 1982, Iron Maid-In, Allegro & The Stroke


From left to right: Lead Zeppelin, Moderato, rem, Alice Copper, Presto & Third Eye Blinded


From left to right: Solid Gold (highlighter), Don't You Want Me? (blush), Milly & Vanilly (lip/cheek tints)

So you can definitely see how fantastic TheBalm products are! They are all just so easy to wear, so easy to blend and are simply some of the best quality products I own. Considering the price tag, you really get more bang for your buck than other brands you would be spending the money on. Another great thing about them is that they are really neither drugstore or high end cosmetic products - they are sold in some higher end stores, but the products themselves are really affordable.. Even in Australia!

You can find TheBalm products at David Jones stores and on their online store. You can also find them on their website, and online boutiques such as Skincare Cosmetics!

Thanks so much for reading! I'd love to hear your favourite products from TheBalm - let me know down below!

Until next time...

xxxx

in between blogging, you can find me here!


*some products featured in this were gifted for consideration, but all opinions are honest and my own :)

6 Jun 2014

review: younique 3D mascara


Hey guys!

Today's review may be a little controversial - I know a lot of us beauty bloggers have grown to dislike this brand because of the amount of sellers that bombard us on our Instagrams, emails and blog posts.  I'll admit, I'm guilty of getting extremely frustrated with certain sellers who constantly comment on my posts asking me to buy their products - even tagging my followers answering questions about products that aren't even featured on my page.

However, I had one independent named Dana who had never tried to gain unwanted attention from me asking if I wanted to try the mascara. Of course, I was curious about the product. So, I said yes, in hopes that I could try the mascara and write this post. Because, even though the sellers may be relentless and annoying at times, this may be a gem of a product hidden behind all that commotion. Think of it kind of Lime Crime lipsticks: Doe Deere herself isn't exactly the greatest selling point for her brand, and turns alot of people off by doing what she does. But the lipsticks themselves aren't bad! And we should give this mascara a chance to speak for itself, shouldn't we?

To do this review, I put my feelings about certain representatives of Younique aside to honestly find if I liked this mascara for itself. I've spoken about my love of fibre lash mascaras before (because I don't like false lashes), so this definitely seems up my alley. Although this was sent to me to try, I need to stress that this is 100% my honest opinion and absolutely unbiased.

Read on to see an overview of the product, a demo of the mascara and my final thoughts!

The mascara is in two tubes - one is the 'Transplanting Gel', which seems to be a mascara type product, and the other smaller tube holds the fibre lashes. Basically, you are supposed to use another mascara of your choosing, then go over it with the Transplanting Gel. Once you do that, you then coat your lashes in the fibres and then go back over with the Transplanting Gel to seal in the product and prevent those pesky fibres from moving from your lashes. I'm not 100% sure if Younique recommends to repeat the process or not, but I don't see why not.


The Transplanting Gel mascara, and a close up of the brush.

This basically looks like a typical mascara wand - a bristle type wand with a black mascara formula. The difference with this is that, once you apply another mascara underneath, you run this over the top to act as a tacky surface for the fibres to hold onto. Going over it after you have placed the fibres over top is supposed to seal the fibres in so that they stay fabulous on your lashes, and don't get stuck in your eyes or go all over your face.


The Fibre Lash mascara, with a close up on the brush.

I know the photo looks out of focus - it's not, trust me. You can definitely see the fibres on there in all their fluffy goodness! I have to say this part of the mascara definitely surprised me - if you've used other fibre lash mascaras, such as the Model Co one or Too Faced Better Than False Lashes,  you'll know that the fibres that come with those mascaras are not only white, but that they also come on an actual mascara wand. Sort of like the Transplanting Gel wand, but a bit smaller.

This is not a wand so much as a little stick. All the fibres are woven around it sort of like candy floss. The other thing is that these fibres are BLACK! I actually love that about this mascara, you don't have to work nearly as hard to conceal those fibres as you do with the other fibre lash mascaras I mentioned above.

Here is a demo of the mascara - these pictures are from my first time trying it:


In the first photo, I only have the Rimmel Lash Accelerator Mascara on my lashes. In the bottom photo, I have only the Rimmel mascara on the left, and the Rimmel mascara plus the Younique mascara. You can see that my lashes on the right are definitely more full, volumised and dramatic when compared to the lashes on the left.

So what do I think?

I'm actually really really impressed with this mascara. I am someone who loves the clumpy-but-not-too-clumpy mascara look, because I have long lashes that can get really spidery really quickly - another reason I love fibre lash mascaras. Considering I expected to not really like it after seeing other before and afters, I am pleasantly surprised.

I think the trick with this mascara is to use a lengethening mascara (like the Rimmel one I used) underneath before going in with the Younique mascara. The Younique masara gives amazing volume so I would say that a volumising mascara underneath isn't necessary. In terms of buildablity, I would only repeat the process twice, otherwise your lashes will be extremely clumpy. Thats just my personal preference though - if you are someone who loves that look, layer it upon layer girl!

The only thing I'm not 100% sold on is the price of this mascara. This retails for $29US each which is a little steep for a mascara that isn't really high end nor drugstore. But, in saying that, you do get the two mascaras in one that are a decent size each and it seems like it will last forvever. Another thing is that the mascara does not dry out my lashes, or pull them off when I try to remove it. So it's really up to personal preference as to whether you would purchase it for yourself or not.

This has just been released to the Australian market, and is available to buy from independent representatives. Thank you so much to the lovely Dana for sending this to me to try out! I definitely think its worth a try if you're a lover of fibre lash mascaras like me, and you can find the products here at her website Dazzling Lashes and Beyond ! You can also find her here on her Instagram.

Thanks for reading guys! I know everyone is going to have a different opinion on this mascara - and it's really down to your own personal preference as to whether you want to try it for yourself or not :)

Until next time...

xxxx


in between blogging, you can find me here!


*This product was gifted to me, but that it no way influences my opinion of it per my Disclaimer 


26 May 2014

first impression: maybelline dream pure bb cream


Hey guys!

After having a disastrorous first round with original Maybelline Dream Fresh BB Cream, I was definitely turned off. Why would I waste my money on a product that complelety oxidised to make me look like an oompa loompa and did absolutely nothing for my skin except sit there looking ugly? When they came out with the newer version for oiler skin, I told myself I wouldn't buy it because of my experience with its older sister. But, of course, Chemist Warehouse has extremely tempting sales and before I knew it, I had walked away with this baby.

I had heard lots of nice things about this BB cream, and the fact that it has salycylic acid in it, which is supposed to be good for acne prone skin. I have normal to dry skin, that rarely sees a bad blemish, but other foundations meant for oily skin (such as the Neutrogena Skin Clearing Foundation) have actually worked really well for my skin and I. So what could it hurt to give this a try, especially with a 50% off sale?

On my display, there were two shades available: Light and Medium. I got the shade Medium, generally because I am always fake tanned and too light for Light. I'm not sure how this would work for darker skin tones as there doesn't seem to be a darker shade.. Pretty poor shade selection unfortunately.

 As I said, I had pretty low expectations. Did this change my mind? Read on to find out!


The BB cream comes in a squeezy tube with 30mL of product, which is pretty standard. So although it doesn't come with a pump, it's still pretty hygenic and you can control the amount of product you use. It also came with the seal cap on it so you know that what you are getting is completely untouched and waiting for you to undo that seal.


The first impression I get of this product is that it is gorgeously creamy and thick. Plus, the colour seemed to be spot on as well! 


Here is the coverage that this BB cream achieves. I'm pretty impressed - considering this is a BB cream, it really covers quite well! The only other BB cream I can really compare it to is one of my favourites, the Chi Chi Cosmetics Super BB Cream. You can only just see my veins poking through.

I have since worn this on a couple of a occasions, and am happy to report that it does not oxidise or slide off my face. I have worn it for about 8-9 hours with only a primer underneath and it has stayed put the entire time! I will probably save these for days where I have to work but do not have to wear a complete face of makeup.

Whether or not this actually works for oily skin, I can't say unfortunately, As I said before, I have normal to dry skin, but this still looks fabulous on me. But whether it will stop your oil, or prevent any breakouts, I really cannot be sure. I would recommend just looking up other reviews or just biting the bullet and trying it for yourself if you can't find a sample.

I found this here during the Chemist Warehouse sale (which is still on for us Aussies and will be on until this Thursday the 29th of May), but you can also get it here at Priceline for $15.95AU not on sale.

Have you tried this BB Cream? Are you as impressed as I am?

Until next time...

xxxx


in between blogging, you can find me here!


26 Mar 2014

first impression: l'oreal false lash butterfly wings mascara

Hey guys!

When Priceline has a good deal, I tend to buy into it. Really who doesn't? It's not that I lack self control (jokes, I actually do), but seeing as the price of cosmetics is so high in Australia, when you see a good deal, you have to take it. Am I right, or am I right?

In this case, Priceline has both the L'Oreal Super Line Blockbuster (which is felt tip, not a kohl, as I initially thought) and the L'Oreal False Lash Butterfly Wings Mascara at 2 for $30AU. The liner by itself is $16.95, and the mascara also retails for a whopping $25.95AU each. I had initially talked myself out of buying the mascara during the 40% off cosmetics sale, because did I really need another mascara (no, I did not). But this was just such a good deal to get the two of them at a much cheaper price that I couldn't resist. Oops.

I personally think L'Oreal makes the best drugstore mascaras - they are just so expensive that I either buy them online or wait for a really good sale (which never happens, just by the by). So of course I wanted to try this out. I just didn't want to pay full price, because let's face it, there are so many cheaper products that I could buy with that $25.95. But, I am always intrigued by new mascaras, and always trying to find a cheaper alternative to my holy grail, the Dior Diorshow mascara.

Before I actually opened this and use it, I wanted to do a first impression for you guys. These photos are from when I actually used this for the first time ever (I hadn't even taken it out of the box prior to this).


One thing I will say, is that I will never understand putting a mascara in a box to sell it. Unless you are going to put a freebie in there for me, what's the point? It's bulky and annoying, plus it really only held the mascara when it is big enough to hold three of them. Anyway, just an observation..


This is what the actually mascara tube looks like once you throw away the useless big ass box it comes in. It's silver with quite a futuristic design. Other than that, it is really quite simple and is average size when compared to other L'Oreal mascaras.


This is a close up of the brush. L'Oreal says that this is an asymmetrical brush for "... ease and precision of application, catching every lash and volumising even the shortest lashes.. No clumping." Big claims L'Oreal!

As you can see, the wand is curved (sort of like a wave), so I can see what they were going for. It's a plastic brush, which is something I'm not particularly fond of, and it also seems to goop a lot of product onto the brush. There's nothing wrong with that in theory, but I find that it really makes it difficult to separate my lashes when there is quite a lot of product on the wand.

Here are the photos of my lashes with and without the mascara:


Lashes without mascara


Lashes with one coat


Lashes with two coats


Comparison to my other mascara-less eye

I am actually pretty impressed with this mascara. I did have a little issue separating them, which is something I anticipated given how much product was on the brush, but I got there in the end. I love how it really fanned out my lashes, and even made my eyes look bigger! That, my friends, is a talented mascara.

I did find it to clump a little when putting on the second coat, which is why I didn't try for a third. But overall, I am happy with the mascara, and I will be using it more to really get a feel for it. I'm hoping it'll dry out a little now that it has been opened, which should solve the issue with separating my lashes. Hopefully..

This retails for $25.95AU normally (eek), but it is on sale at Priceline with the 2 for $30AU until tomorrow. If you think you'd like it, go and grab one while you still can!

Have you tried this mascara? What are your thoughts?

Until next time babes...

xxxx


in between blogging, you can find me here!


11 Mar 2014

first impression: too faced chocolate bar palette

Hey guys!

I am so excited to finally bring you today's post. I have literally kept my hands off the shadows in this palette since I received it, as I wanted this to be a true first impression of the shades and their quality. I have only opened and closed it, and let me tell you.. this looks and smells good enough to eat. Without further ado, let me introduce to you today's blogpost and highly anticipated first impression...

The Too Faced Chocolate Bar Palette!


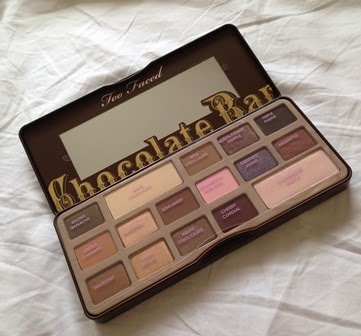
Oh gee.. I literally love all things Too Faced. There is not a product from them that I have disliked, and I always remember them for their packaging. Check out how cute the box is that the palette comes in! It reminds me of a Willy Wonka chocolate bar, and I feel it is so perfect and girly. I can't even bring myself to throw away this box, because its too pretty!


When you first open the box, you get the palette and also these index cards, which basically have three looks using shadows from the palette and how to recreate them. This is pretty typical from Too Faced, with every eye shadow palette they come out with, they usually include some inserts with looks. They are helpful if you're not sure what to create on your own.

And then of course, the palette..


If any of you are waiting on this palette, I'm going to give you a tip. When you first open it, inhale deeply. Smell that? Oh yea, thats chocolate. If you know the smell of the Too Faced Chocolate Soliel Bronzer, basically imagine that times 10. The smell is just incredible, that it makes me want to eat the palette. It makes sense, seeing as it is made with cocoa!

Also, check out that packaging. Again, Too Faced hits the nail on the head. The palette is shaped just like a chocolate bar! The shadows are housed in tin packing, which opens and closes pretty easily. I think its magnetized, rather than the Urban Decay Naked 2 & 3 for example, where the tin actually locks when its closed. Because of that, I'm not sure how great this would be to travel with, but the packaging itself is sturdy.

Once open, you can see the palette has quite a sizeable mirror! It's definitely big enough to be able to do your whole eye look with. You know how some mirrors are just so tiny, and you just cannot use it to do your eyes? Well, there will be no problems with this one! The palette itself comes with 16 shadows, ranging from pinks, reds, violets, browns, neutrals and whites that are all different textures; some are matte, some have shimmer and others are glittery. Overall, it really sticks to the chocolate theme, and focuses on the neutral shades, with a couple of colourful shades to mix things up.

The shadows themselves are great - they have pretty decent colour pay off, and all go on like butter. Really, they are very seamless; they all work really well together and compliment the other shades in the palette. I can see how easy it would be to create looks with only this palette, you can see that it has been designed so that no other shadows outside of the palette need to be used.

First row (l-r) - Gilded Ganache, White Chocolate, Milk Chocolate, Black Forest Truffle, Triple Fudge

Gilded Ganche - A deep brown shade with gold shimmer throughout
White Chocolate - A matte highlight shade
Milk Chocolate - A mid tone cool brown shade
Black Forest Truffle - A dark brown with what looks like pink shimmer throughout. Similar to Blackheart from the Urban Decay Naked 3 Palette
Triple Fudge - A matte dark brown shade

Second row (l-r) - Salted Caramel, Marzipan, Semi-Sweet, Strawberry Bon Bon, Candied Violet, Amaretto

Salted Caramel - An very wam toned brown. Very natural and neutral for the crease
Marzipan - A champagne shade
Semi-Sweet - A deep red, warm toned brown
Strawberry Bon Bon - A matte baby pink
Candied Violet - A purple shade with pink glitter
Amaretto - A rusty red, shimmery shade. This was the shade I was most excited about, especially when I swatched it and saw the sheen after it was applied. Beautiful shade!

Third row (l-r) - Hazelnut, Creme Brulee, Haute Chocolate, Cherry Cordial, Champagne Truffle

Hazelnut - A neutral, warm toned shimmery brown shade
Creme Brulee - A shimmery gold shade
Haute Chocolate - Similar to Hazelnut, except cool toned
Cherry Cordial - A red shade with a hint of shimmer. The shimmer didn't really translate when I swatched it on my arm
Champagne Truffle - The other highlight colour in the palette, and is a shimmery white shade

Overall, do I think you need this palette? Um yes! Especially if you are a fan of neutral shades, I would definitely recommend giving this a try. It is pricey, but its Too Faced - they're a highly reputable brand and you know that you're getting both quality and quantity for the price you pay. I have heard that people are comparing this to Urban Decay Naked 1, and saying that they are quite similar. I really don't think they are. They are both neutral palettes, and particular shades are similar, but I don't think that they are so similar that you can only pick one or the other.

I got this from www.beautybay.com , and I believe I paid $69.80AU for it. However, for Australians, this is available on www.kitcosmetics.com.au (which I wish I knew before) for $68.95AU, and if you spend over $75 you get free shipping. I would recommend going through them rather than BeautyBay, only because the palette comes from Australia itself, and they are a little more helpful if you have an issue. In the US, this retails for $49USD in both Ulta and Sephora.

I could harp on about this palette forever! I am such a neutral eye girl, and this palette really fulfills that need, plus it throws in a couple of colourful shades to really amp up any look. So glad that I brought it and that I finally own it :)

Stay tuned for tomorrows post - it will be involving this palette ;)

Until next time...

xxxx

19 Feb 2014

first impression: urban decay naked 3 palette

Hi lovelies!
 
I am soooo excited to do this post for you. I have literally been bouncing off the walls since I received this yesterday.
 
I am a huge fan of Urban Decay cosmetics. I have all the Naked palettes (1,2 and the Basics), their Naked foundation and some of their revolution lipsticks. I love everything, and have seriously considered buying more, but their price is stopping me in my tracks. If you know me, you would know that the original Naked palette is honestly my favourite eyeshadow palette of all time. I use it constantly on myself and others. I do like the Naked 2, but I tend to lean towards warmer shadows (the Naked 2 is cool toned). So when I heard that the Naked 3 was an actual thing (remember when everyone was saying that it was fake?), and that it would be a PINK warmed and cool toned ROSE GOLD palette, holy hell, I knew I had to get my hands on that.
 
When I went to New York last year, I was meant to be there from the 1st of December til the 7th, which meant I would've been there for the release of the Naked 3 palette on December 6th. However, my trip was moved up a week, and instead I returned home on the 1st instead of leaving, so I missed the release. As most Australians who love cosmetics know, Urban Decay is not available to buy over here. It is available online, but is incredibly overpriced when compared to the US price. So instead of buying it on BeautyBay, where it is over $80, I decided to wait until a family member went to the US and asked them to purchase it for me.


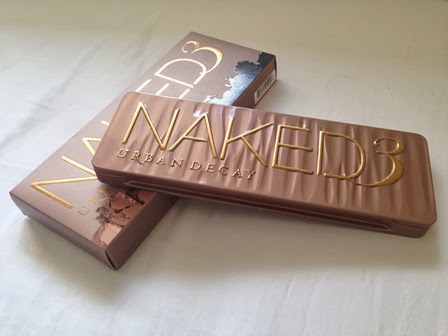
I, like most other females, love rose gold. And the packaging is rose gold. The excitement. Can't handle it.
 
The eyeshadows are encased a tin, similar to the Naked 2 palette. Its pretty easy to open, but not in the way that it is just going to fly open at first touch. It's pretty sturdy, so I know that this baby won't be opening unless I actually do it myself. I'm guessing that this will be good to travel with.


It also comes with samples of its well known Urban Decay Eyeshadow Primer Potion, but instead of the teeny little bottle that it came with in the original Naked palette, it comes with four little samples the of original formula, a matte formula called Eden, a shimmering formula called Sin (which I assume is similar to the eyeshadow Sin) and an anti-aging formula. I personally prefer the bottle that came with the Naked palette, just because I think its more hygienic, and am partial to tiny versions of products. But, I am happy that this came with four different bases, which I didn't actually know they had, so that was a nice little surprise. I guess they're also catering to everyones needs, as the original formula may not work for everyone. That's pretty considerate, I'm impressed.
 
It also comes with a dual ended brush, similar to the one that came with the Naked 2 palette, but I forgot to get a photo of the brush itself.
 
 
Now to the actual palette..
 
I decided to dedicate this post to swatches of the eyeshadows in the palette. As the palette is pink and rose gold themed, the shadows really keep with this and almost all have a pink undertone to them. It is super romantic, and I only wish I had this to do a Valentines Day look for you guys, because this is literally Valentines Day in the form of an eyeshadow palette.


The shadows in the left half of the palette are:
 
Strange: A white highlight
Dust: A shimmery light pink
Burnout: A semi-shimmery mauve pink
Limit: A matte mauve pink
Buzz: Glittery pink. Is quite chunky, as you can see in the swatches above
Trick: A rose gold, and my favourite out of all shadows. It is tricky, like its name, to swatch. I think to get this colour to come up more you will have to wet your brush with some sort of setting spray.


The shadows in the right half of the palette are:
 
Nooner: A darker, purple-ly pink. Perfect transition shade
Liar: A purple-ly pinkish shimmery colour
Factory: A shimmery taupe, with pink undertones
Mugshot: A gunmetal grey, with shimmer
Darkside: A darker shimmery grey
Blackheart: A black colour, with pink shimmer throughout
 
So, is this palette worth it?
 
I believe it is. I think because it is so different to the other Naked palettes, you can create so many different looks with it. I love that they have a palette dedicated to pink shadows, and the palette has such a romantic feel to it. I am a lover of all the Naked palettes, as I said before, so I knew that the chances of me disliking this palette were slim. I think this has the perfect mix of warm and cool shades, so it has something for everyone. If you are someone who leans towards warm or cool neutral shades, and are looking for something different (but not too out of your comfort zone), I would definitely give it a try.
 
However, as I always recommend, I would definitely try to find it cheaper online, especially if you are Australian and use BeautyBay quite frequently. Don't get me wrong, I love BeautyBay and use it often myself, and in most cases their prices are fair for our market. But to charge $81.60AU for the palette isn't fair (even with free shipping), so I would have to say that the best option is to either use a shipping service and get it from Sephora, where it is $52US (around $55AU), or search online further. Do be careful though, because others have been duped with fakes!
 
Hope you enjoyed the first impression! Let me know in the comments below if you would like to see more of these posts, and keep your eyes peeled for tomorrows post which may be a tutorial on this palette ;)
 
*all products mentioned in this post were purchased by me, and opinions and photos are all my own*